TensorRT(3)-C++ API使用:mnist手写体识别

本节将介绍如何使用tensorRT C++ API 进行网络模型创建。

1 使用C++ API 进行 tensorRT 模型创建

还是通过 tensorRT官方给的一个例程来学习。

还是mnist手写体识别的例子。上一节主要是用 tensorRT提供的NvCaffeParser来将 Caffe中的model 转换成tensorRT中特有的模型结构。NvCaffeParser是tensorRT封装好的一个用以解析Caffe模型的工具 (较顶层的API),同样的还有 NvUffPaser是用于解析TensorFlow的工具。

除了以上两个封装好的工具之外,还可以使用tensorRT提供的C++ API(底层的API)来直接在tensorRT中创建模型。这时 tensorRT 相当于是一个独立的深度学习框架了,这个框架和其他框架(Caffe, TensorFlow,MXNet等)一样都具备搭建网络模型的能力(只有前向计算没有反向传播)。

不同之处在于:

  • 这个框架不能用于训练,模型的权值参数要人为给定;
  • 可以针对设定网络模型(自己使用API创建网络模型)或给定模型(使用NvCaffeParser或NvUffPaser导入其他深度学习框架训练好的模型)做一系列优化,以加快推理速度(inference)

使用C++ API函数部署网络主要分为四个步骤:

  • 创建网络;
  • 为网络添加输入;
  • 添加各种各样的层;
  • 设定网络输出;

以上,第1,2,4步骤在使用 NvCaffeParser 时也是有的。只有第3步是本节所讲的方法中特有的,其实对于NvCaffeParser 工具来说,他只是把 第 3步封装起来了而已。

如下,对比一下 NvCaffeParser 的使用方法,下面的代码中只列出了关键部分的代码。完整代码请看上一节。

1
2
3
4
5
6
7
8
9
10
11
12
13
14
15
16
17
18
19
20
21
22
23
24
25
26
27
28
//build phase
INetworkDefinition* network = builder->createNetwork(); //1. 创建网络
CaffeParser* parser = createCaffeParser();
std::unordered_map<std::string, infer1::Tensor> blobNameToTensor;
const IBlobNameToTensor* blobNameToTensor = //3. 添加各种各样的层
parser->parse(locateFile(deployFile).c_str(), //NvCaffeParser 工具
locateFile(modelFile).c_str(), //把添加层的内容封装起来了
*network,
DataType::kFLOAT);
for (auto& s : outputs)
network->markOutput(*blobNameToTensor->find(s.c_str())); // 4. 设定网络输出
ICudaEngine* engine = builder->buildCudaEngine(*network); //创建engine
//省略一些内容………………
//execution phase
IExecutionContext *context = engine->createExecutionContext(); //创建 context
int inputIndex = engine->getBindingIndex(INPUT_BLOB_NAME),
outputIndex = engine->getBindingIndex(OUTPUT_BLOB_NAME); //2.为网络添加输入
//省略一些内容………………
context.enqueue(batchSize, buffers, stream, nullptr); //调用cuda核计算
cudaStreamSynchronize(stream); //同步cuda 流

上述四个步骤对应部分已在注释标出。可见 NvCaffeParser 工具中最主要的是 parse 函数,这个函数接受网络模型文件(deploy.prototxt)、权值文件(net.caffemodel)为参数,这两个文件是caffe的模型定义文件和训练参数文件。parse 函数会解析这两个文件并对应生成 tensorRT的模型结构。

对于NvCaffeParser 工具来说,是需要三个文件的,分别是:

  • 网络模型文件(比如,caffe的deploy.prototxt)
  • 训练好的权值文件(比如,caffe的net.caffemodel)
  • 标签文件(这个主要是将模型产生的数字标号分类,与真实的名称对应起来)

以下分步骤说明四个步骤:

1.1 创建网络

先创建一个tensorRT的network,这个network 现在只是个空架子,比较简单:

1
INetworkDefinition* network = builder->createNetwork();

1.2 为网络添加输入

所有的网络都需要明确输入是哪个blob,因为这是数据传送的入口。

1
2
// Create input of shape { 1, 1, 28, 28 } with name referenced by INPUT_BLOB_NAME auto
data = network->addInput(INPUT_BLOB_NAME, dt, DimsCHW{ 1, INPUT_H, INPUT_W});
  • INPUT_BLOB_NAME 是为输入 blob起的名字;

  • dt是指数据类型,有kFLOAT(float 32), kHALF(float 16), kINT8(int 8)等类型;

    1
    2
    3
    4
    5
    6
    7
    8
    //位于 NvInfer.h 文件
    enum class DataType : int
    {
    kFLOAT = 0, //!< FP32 format.
    kHALF = 1, //!< FP16 format.
    kINT8 = 2, //!< INT8 format.
    kINT32 = 3 //!< INT32 format. 这个是TensorRT新增的
    };
  • DimsCHW{ 1, INPUT_H, INPUT_W} 是指,batch为1(省略),channel 为1,输入height 和width分别为 INPUT_H, INPUT_W的blob;

1.3 添加各种各样的层

  • 以下示例是添加一个 scale layer
1
2
3
4
5
6
// Create a scale layer with default power/shift and specified scale parameter. float
scale_param = 0.0125f;
Weights power{DataType::kFLOAT, nullptr, 0};
Weights shift{DataType::kFLOAT, nullptr, 0};
Weights scale{DataType::kFLOAT, &scale_param, 1};
auto scale_1 = network->addScale(*data, ScaleMode::kUNIFORM, shift, scale, power);

主要就是 addScale 函数,后面接受的参数是这一层需要设置的参数。

scale 层的作用是对每个输入数据进行幂运算

f(x)= (shift + scale * x) ^ power

层类型:Power

可选参数:

  power: 默认为1

  scale: 默认为1

  shift: 默认为0

就是一种激活层。

Weights 类的定义如下:

1
2
3
4
5
6
7
8
9
//NvInfer.h 文件
class Weights
{
public:
DataType type; //!< the type of the weights
const void* values; //!< the weight values, in a contiguous array
int64_t count; //!< the number of weights in the array
};

以上是不包含训练参数的层,还有 Relu层,Pooling层等。

包含训练参数的层,比如卷积层,全连接层,要先加载权值文件。

  • 以下示例是添加一个卷积层
1
2
3
4
5
6
7
8
9
// Add convolution layer with 20 outputs and a 5x5 filter.
// 加载权值文件,加载一次即可
std::map<std::string, Weights> weightMap = loadWeights(locateFile("mnistapi.wts"));
//添加卷积层
IConvolutionLayer* conv1 = network->addConvolution(*scale_1->getOutput(0), 20, DimsHW{5, 5}, weightMap["conv1filter"], weightMap["conv1bias"]);
//设置步长
conv1->setStride(DimsHW{1, 1});

第6行添加卷积层:

1
IConvolutionLayer* conv1 = network->addConvolution(*scale_1->getOutput(0), 20, DimsHW{5, 5}, weightMap["conv1filter"], weightMap["conv1bias"]);
*scale_1->getOutput(0) :获取上一层 scale层的输出

20:卷积核个数,或者输出feature map 层数

DimsHW{5, 5}:卷积核大小

weightMap["conv1filter"], weightMap["conv1bias"]:权值系数矩阵

上面的 mnistapi.wts 文件,是用于存放网络中各个层间的权值系数的,该文件位于 /usr/src/tensorrt/data 文件夹中。

可以用notepad打开看一下,如下:

1514951727343

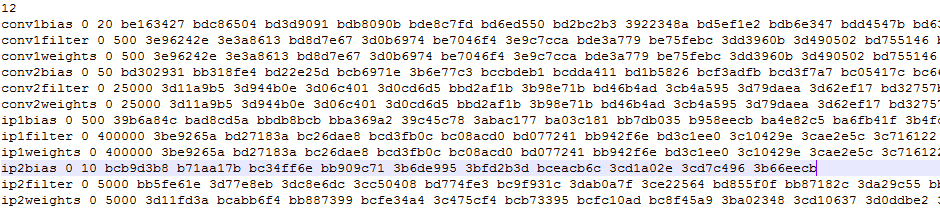
可见每一行都是一层的一些参数,比如 conv1bias 是指第一个卷积层的偏置系数,后面的0 指的是 kFLOAT 类型,也就是 float 32;后面的20是系数的个数,因为输出是20,所以偏置是20个;下面一行是 卷积核的系数,因为是20个 5×5的卷积核,所以有 20×5×5=500个参数。其它层依次类推。

这个文件是例程中直接给的,感觉像是 用caffe等工具训练后,将weights系数从caffemodel 中提取出来的。直接读取caffemodel应该也是可以的,稍微改一下接口:解析caffemodel文件然后将层名和权值参数键值对存到一个map中,网上大概找了一下,比如 这个 ,解析后的caffemodel如下所示:

Screenshot from 2018-01-03 09-33-01

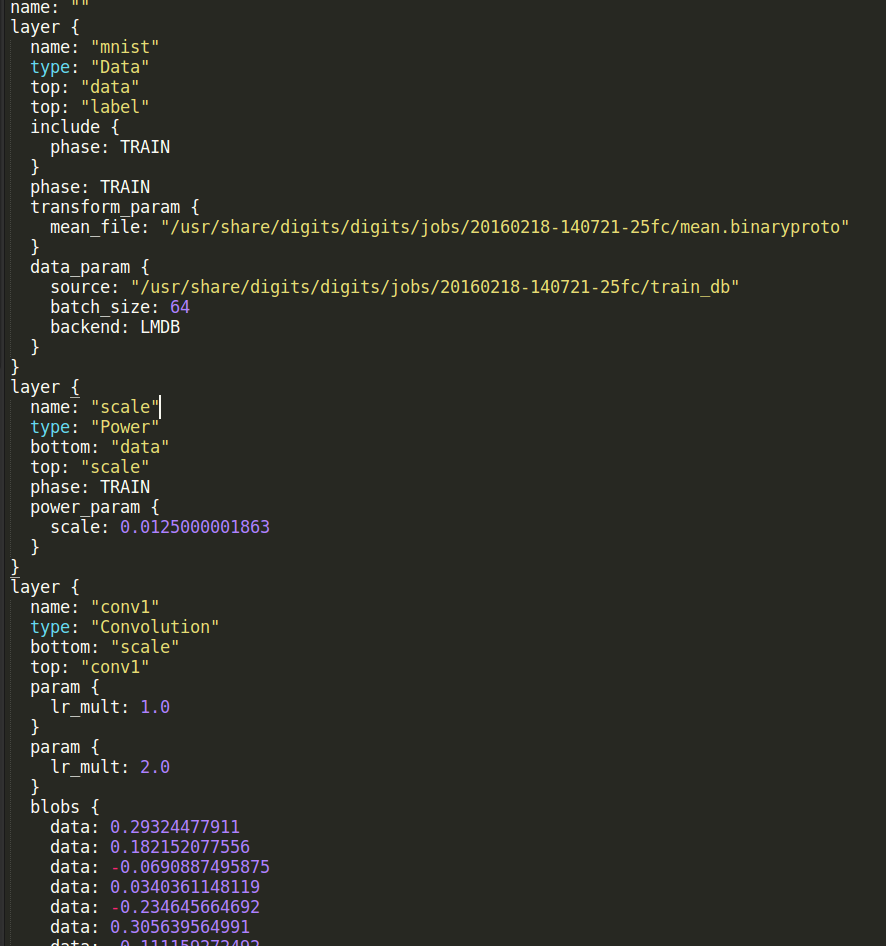
conv1 最下面有一个 blobs结构,这个是weights系数;每一个包含参数的层(卷积,全连接等;激活层,池化层没有参数)都有一个 blobs结构。只需将这些参数提取出来,保存到一个map中。

除此之外也可以添加很多其他的层,比如反卷积层,池化层,全连接层等,具体参考 英伟达官方API

添加层的过程就相当于 NvCaffeParser 工具中 parse 函数解析 deploy.prototxt 文件的过程。

1.4 设定网络输出

网络必须知道哪一个blob是输出的。

如下代码,在网络的最后添加了一个softmax层,并将这个层命名为 OUTPUT_BLOB_NAME,之后指定为输出层。

1
2
3
4
// Add a softmax layer to determine the probability.
auto prob = network->addSoftMax(*ip2->getOutput(0));
prob->getOutput(0)->setName(OUTPUT_BLOB_NAME);
network->markOutput(*prob->getOutput(0));

那直接使用底层API有什么好处呢?看下表

Feature C++ Python NvCaffeParser NvUffParser
CNNs yes yes yes yes
RNNs yes yes no no
INT8 Calibration yes yes NA NA
Asymmetric Padding yes yes no no

上表列出了 tensorRT 的不同特点与 API 对应的情况。可以看到对于 RNN,int8校准(float 32 转为 int8),不对称 padding 来说,NvCaffeParser是不支持的,只有 C++ API 和 Python API,才是支持的。

所以说如果是针对很复杂的网络结构使用tensorRT,还是直接使用底层的 C++ API,和Python API 较好。底层C++ API还可以解析像 darknet 这样的网络模型,因为它需要的就只是一个层名和权值参数对应的map文件。

2 官方例程

例程位于 /usr/src/tensorrt/samples/sampleMNISTAPI

2.1 build phase

1
2
3
4
5
//这个是main函数中的代码片段
// create a model using the API directly and serialize it to a stream
IHostMemory *modelStream{nullptr};
//调用APIToModel函数,手动创建网络模型
APIToModel(1, &modelStream);

APIToModel函数:

1
2
3
4
5
6
7
8
9
10
11
12
13
14
15
16
17
void APIToModel(unsigned int maxBatchSize, IHostMemory** modelStream)
{
// Create builder
IBuilder* builder = createInferBuilder(gLogger);
//下面这个createMNISTEngine函数才是真正手动创建网络的过程
// Create model to populate the network, then set the outputs and create an engine
ICudaEngine* engine = createMNISTEngine(maxBatchSize, builder, DataType::kFLOAT);
assert(engine != nullptr);
// Serialize the engine
(*modelStream) = engine->serialize();
// Close everything down
engine->destroy();
builder->destroy();
}

createMNISTEngine函数如下:

1
2
3
4
5
6
7
8
9
10
11
12
13
14
15
16
17
18
19
20
21
22
23
24
25
26
27
28
29
30
31
32
33
34
35
36
37
38
39
40
41
42
43
44
45
46
47
48
49
50
51
52
53
54
55
56
57
58
59
60
61
62
63
64
65
66
67
68
69
70
71
72
73
74
75
// Creat the engine using only the API and not any parser.
ICudaEngine* createMNISTEngine(unsigned int maxBatchSize, IBuilder* builder, DataType dt)
{
INetworkDefinition* network = builder->createNetwork();
// Create input tensor of shape { 1, 1, 28, 28 } with name INPUT_BLOB_NAME
ITensor* data = network->addInput(INPUT_BLOB_NAME, dt, Dims3{1, INPUT_H, INPUT_W});
assert(data);
// Create scale layer with default power/shift and specified scale parameter.
const float scaleParam = 0.0125f;
const Weights power{DataType::kFLOAT, nullptr, 0};
const Weights shift{DataType::kFLOAT, nullptr, 0};
const Weights scale{DataType::kFLOAT, &scaleParam, 1};
IScaleLayer* scale_1 = network->addScale(*data, ScaleMode::kUNIFORM, shift, scale, power);
assert(scale_1);
// Add convolution layer with 20 outputs and a 5x5 filter.
// 加载权值文件,加载一次即可
std::map<std::string, Weights> weightMap = loadWeights(locateFile("mnistapi.wts"));
// 添加卷积层
IConvolutionLayer* conv1 = network->addConvolution(*scale_1->getOutput(0), 20, DimsHW{5, 5}, weightMap["conv1filter"], weightMap["conv1bias"]);
assert(conv1);
//设置步长
conv1->setStride(DimsHW{1, 1});
// Add max pooling layer with stride of 2x2 and kernel size of 2x2.
IPoolingLayer* pool1 = network->addPooling(*conv1->getOutput(0), PoolingType::kMAX, DimsHW{2, 2});
assert(pool1);
pool1->setStride(DimsHW{2, 2});
// Add second convolution layer with 50 outputs and a 5x5 filter.
IConvolutionLayer* conv2 = network->addConvolution(*pool1->getOutput(0), 50, DimsHW{5, 5}, weightMap["conv2filter"], weightMap["conv2bias"]);
assert(conv2);
conv2->setStride(DimsHW{1, 1});
// Add second max pooling layer with stride of 2x2 and kernel size of 2x3>
IPoolingLayer* pool2 = network->addPooling(*conv2->getOutput(0), PoolingType::kMAX, DimsHW{2, 2});
assert(pool2);
pool2->setStride(DimsHW{2, 2});
// Add fully connected layer with 500 outputs.
IFullyConnectedLayer* ip1 = network->addFullyConnected(*pool2->getOutput(0), 500, weightMap["ip1filter"], weightMap["ip1bias"]);
assert(ip1);
// Add activation layer using the ReLU algorithm.
IActivationLayer* relu1 = network->addActivation(*ip1->getOutput(0), ActivationType::kRELU);
assert(relu1);
// Add second fully connected layer with 20 outputs.
IFullyConnectedLayer* ip2 = network->addFullyConnected(*relu1->getOutput(0), OUTPUT_SIZE, weightMap["ip2filter"], weightMap["ip2bias"]);
assert(ip2);
// Add softmax layer to determine the probability.
ISoftMaxLayer* prob = network->addSoftMax(*ip2->getOutput(0));
assert(prob);
prob->getOutput(0)->setName(OUTPUT_BLOB_NAME);
network->markOutput(*prob->getOutput(0));
// Build engine
builder->setMaxBatchSize(maxBatchSize);
builder->setMaxWorkspaceSize(1 << 20);
ICudaEngine* engine = builder->buildCudaEngine(*network);
// Don't need the network any more
network->destroy();
// Release host memory
for (auto& mem : weightMap)
{
free((void*) (mem.second.values));
}
return engine;
}

可见里面包含了很多 add* 函数,都是用于添加各种各样的层的。可参考英伟达官方API

2.2 deploy phase

deploy阶段基本与之前的无异。

1
2
3
4
5
6
7
8
9
10
11
12
13
14
15
16
17
18
19
20
21
22
int main(int argc, char** argv)
{
………………
………………
// Deserialize engine we serialized earlier
// 创建运行时环境 IRuntime对象,传入 gLogger 用于打印信息
IRuntime* runtime = createInferRuntime(gLogger);
assert(runtime != nullptr);
ICudaEngine* engine = runtime->deserializeCudaEngine(trtModelStream->data(), trtModelStream->size(), nullptr);
assert(engine != nullptr);
trtModelStream->destroy();
//创建上下文环境,主要用于inference 函数中启动cuda核
IExecutionContext* context = engine->createExecutionContext();
assert(context != nullptr);
//2.deploy 阶段:调用 inference 函数,进行推理过程
// Run inference on input data
float prob[OUTPUT_SIZE];
doInference(*context, data, prob, 1);
………………
………………
}

doInference函数如下:

1
2
3
4
5
6
7
8
9
10
11
12
13
14
15
16
17
18
19
20
21
22
23
24
25
26
27
28
29
30
31
32
33
void doInference(IExecutionContext& context, float* input, float* output, int batchSize)
{
const ICudaEngine& engine = context.getEngine();
// Pointers to input and output device buffers to pass to engine.
// Engine requires exactly IEngine::getNbBindings() number of buffers.
assert(engine.getNbBindings() == 2);
void* buffers[2];
// In order to bind the buffers, we need to know the names of the input and output tensors.
// Note that indices are guaranteed to be less than IEngine::getNbBindings()
const int inputIndex = engine.getBindingIndex(INPUT_BLOB_NAME);
const int outputIndex = engine.getBindingIndex(OUTPUT_BLOB_NAME);
// Create GPU buffers on device
CHECK(cudaMalloc(&buffers[inputIndex], batchSize * INPUT_H * INPUT_W * sizeof(float)));
CHECK(cudaMalloc(&buffers[outputIndex], batchSize * OUTPUT_SIZE * sizeof(float)));
// Create stream
cudaStream_t stream;
CHECK(cudaStreamCreate(&stream));
// DMA input batch data to device, infer on the batch asynchronously, and DMA output back to host
CHECK(cudaMemcpyAsync(buffers[inputIndex], input, batchSize * INPUT_H * INPUT_W * sizeof(float), cudaMemcpyHostToDevice, stream));
context.enqueue(batchSize, buffers, stream, nullptr);
CHECK(cudaMemcpyAsync(output, buffers[outputIndex], batchSize * OUTPUT_SIZE * sizeof(float), cudaMemcpyDeviceToHost, stream));
cudaStreamSynchronize(stream);
// Release stream and buffers
cudaStreamDestroy(stream);
CHECK(cudaFree(buffers[inputIndex]));
CHECK(cudaFree(buffers[outputIndex]));
}

参考资料

  1. caffe中的一些激活函数:http://www.cnblogs.com/denny402/p/5072507.html
  2. caffemodel 解析:http://www.cnblogs.com/zjutzz/p/6185452.html
  3. caffemodel 解析:http://www.cnblogs.com/zzq1989/p/4439429.html
  4. tensorRT C++ API:https://docs.nvidia.com/deeplearning/sdk/tensorrt-api/c_api/index.html
  5. tensorRT python API:https://docs.nvidia.com/deeplearning/sdk/tensorrt-api/python_api/index.html
  6. tensorRT 开发者指南:https://docs.nvidia.com/deeplearning/sdk/tensorrt-developer-guide/index.html
  7. NVIDIA Deep Learning SDK:https://docs.nvidia.com/deeplearning/sdk/index.html

本文标题:TensorRT(3)-C++ API使用:mnist手写体识别

本文作者:arleyzhang

发布时间:2018年08月31日 - 18:08

最后更新:2018年08月31日 - 18:08

本文链接:https://arleyzhang.github.io/articles/7629a20/

版权声明: 本文由 arleyzhang 原创,采用 保留署名-非商业性使用-禁止演绎 4.0-国际许可协议,转载请保留原文链接及作者!